Table of contents
Introduction
In Using i3 as a Window Manager for Increased Productivity, a number of reasons were given to get going with this fantastic tiling window manager. Now, it’s time to jump in and explore how to actually use i3! If you’re looking for an in-depth guide, the official i3 documentation or the i3 page on the Arch Wiki are awesome resources to dive deeper. Here, we’ll focus on day-to-day usage based on my current configuration file which I have used and refined over the past three years or so. I hope that you’ll be able to glean useful tips and tricks to apply to your own use case.
The Configuration File
To set keybindings, it may be handy to know the keycodes and their respective names. To get a full list, you can use xmodmap -pk in the terminal. If you’re not sure of the name of the key you want to press (is it “PageDown”, “PageDwn” or “Next”?), you can retrieve it by executing the xev command, which will open two windows: one for capturing the actual key press and the other one to display the relevant details for that key. For example, if you press the backspace key, the output will contain something like keycode 22 (keysym 0xff08, BackSpace). From there, you will know that a mapping would be of the form mod+BackSpace, where mod is the modifier of your choice that is usually specified at the top of the configuration file. Now we can start!
i3 config shortcuts
# Paths and names
set $brightness-laptop-down      "light -U 1"
set $brightness-laptop-up        "light -A 1"
set $brightness-monitor-default  "python3 ~/.local/bin/monitor_brightness default"
set $brightness-monitor-down     "python3 ~/.local/bin/monitor_brightness down"
set $brightness-monitor-up       "python3 ~/.local/bin/monitor_brightness up"
set $brightness-toggle-laptop    ~/.local/bin/toggle_laptop_brightness
set $default-web-browser         brave-browser-stable
set $launcher-python-term        ~/.config/ipython_launch.sh
set $launcher-temp-notes         ~/.config/tmpnotes_launch.sh
set $launcher-todoist            ~/.config/todoist_launch.sh
set $path-xrandr-both            ~/.config/i3/run_xrandr.sh
set $path-xrandr-laptop          ~/.config/i3/run_xrandr_laptop.sh
set $path-xrandr-monitor         ~/.config/i3/run_xrandr_monitor.sh
set $screenshots-folder          ~/Pictures/screenshots/
set $todoist-app-name            "crx_elldfnmogicegdcphgljaoaklkpcnbnn"
set $toggle-mic-on-off           ~/.local/bin/toggle_mic_source

# i3 specific
set $center-mouse exec           ~/.config/i3/center-mouse
set $default-web-browser-class   "(?i)brave-browser"
set $exec                        exec --no-startup-id
set $output-primary              output eDP
set $output-secondary            output HDMI-A-0
set $python-term                 "ipythonterm"
set $scratchpad-size             1920 1060
set $temp-notes                  "tmpnotes"
set $volumepath                  ~/.config/i3-volume/volume

# set mod key (Mod1=Alt, Mod4=Super)
# ⇒ the main modifier used to trigger shortcuts
set $mod Mod4

# Workspaces
#######################################
# Workspace names — can be customized with emojis and names
# ⇒ I find I like minimalism best and just mentally associate
#   one workspace number with a specific type of task
# ⇒ those are set across all monitors
set $ws1  "1"
set $ws2  "2"
set $ws3  "3"
set $ws4  "4"
set $ws5  "5"
set $ws6  "6"
set $ws7  "7"
set $ws8  "8"
set $ws9  "9"
set $ws10 "10"

# Modes
#######################################
# set shut down, restart and locking features
# ⇒ type `$mod+Shift+Delete` then either `e`, `r` or `s`
mode "$mode_system" {
    bindsym e  exec --no-startup-id i3-msg exit
    bindsym r  exec --no-startup-id systemctl reboot
    bindsym s  exec --no-startup-id systemctl poweroff

    # exit system mode with "Enter" or "Escape"
    bindsym Return mode "default"
    bindsym Escape mode "default"
}
set $mode_system (e)xit, (r)eboot, (s)hutdown
bindsym $mod+Shift+Delete   mode "$mode_system"

# resize with smaller steps to get more control
mode "resize" {
        bindsym h resize shrink width 2 px or 2 ppt
        bindsym j resize grow height 2 px or 2 ppt
        bindsym k resize shrink height 2 px or 2 ppt
        bindsym l resize grow width 2 px or 2 ppt

        # exit resize mode: Enter or Escape
        bindsym Return mode "default"
        bindsym Escape mode "default"
}
bindsym $mod+r mode "resize"

# Show the next scratchpad window or hide the focused scratchpad window.
# If there are multiple scratchpad windows, this command cycles through them.
# There is an additional keybinding to allow a floating window to be toggled
# (recovered as a normal window).
# keycode 179 = F10 button
# (not the actual F10 key, but same button on my laptop with default function!)
mode "Scratchpad"{
  bindcode 179              scratchpad show, resize set 1920 1060, move position center; \
                            scratchpad show, resize set 1920 1060, move position center
  bindsym $mod+Shift+space  floating toggle; mode "default"
  bindsym $mod+Escape       kill; mode "default"
  bindsym Escape            scratchpad show; mode "default"
}
bindcode 179 mode "Scratchpad"; scratchpad show, resize set 1920 1060, move position center

# Caps Lock indicator, seen at
# https://www.reddit.com/r/i3wm/comments/k8m4k4/share_your_i3_tips_and_tricks_that_you_have/gf2lppd
mode "-------------------- CAPSLOCK --------------------" {
    bindsym Caps_Lock mode "default"
}
bindsym Caps_Lock mode "-------------------- CAPSLOCK --------------------"

# Sound
#######################################
set $statuscmd i3status

# Signal used to update the status line
set $statussig SIGUSR1

# Amount to increase/decrease volume as a percentage
set $volumestep 5

# Font
#######################################
# font for window titles
# ⇒ this is what you see in your i3bar
set $font-small font xft:Lato 12
set $font-medium font xft:Lato 14

# Set default font
$font-small

# Font used with Rofi (dmenu alternative)
set $rofi-font 'JetBrainsMono 16'

# Keyboard
#######################################
# Set the compose key to right Control
set $compose-key "compose:rctrl"
A few notes on the i3 config shortcuts:
- This section appears at the top because it will affect how i3 works in general.
- It makes extensive use of the
setcommand so that all important shortcuts and paths to programs that could “break” if they are missing are easy to configure globally. - It sets all the different modes that i3 can use so it can be extended in one single place.
- I use
Altin a few applications and reserveSuperfor the window manager only. - Find the font name you need with
fc-list. For instance, to use JetBrains’ font:fc-list | grep Jet.
General settings
# launch a terminal
bindsym $mod+Return  exec kitty

# launch a terminal in the same directory currently used
bindsym $mod+Shift+Return exec cd "$(xcwd)" && exec kitty

# kill focused window
# ⇒ usual way to close applications
bindsym $mod+Escape   kill
bindsym $mod+mod1+Escape --release  $exec xkill

# reload the configuration file
# ⇒ apply changes from this file on the fly
bindsym $mod+Shift+c  reload

# restart i3 inplace
# ⇒ preserves your layout/session, can be used when upgrading i3
bindsym $mod+Shift+r  restart

# exit i3
# ⇒ logs you out of your X session
bindsym $mod+Shift+e  $exec i3-msg exit

# resize windows
# you can also use the mouse for that:
# for tiled windows ⇒
  # drag the border with LeftClick or RightClick
# for floating windows ⇒
  # `mod + RightClick`, then drag

# resize without entering "resize mode"
# ⇒ I find this more convenient. I usually don't care about
# precise window sizes, so here the steps are far greater.
# If I want more control, then entering resize mode will do.
bindsym $mod+Control+l resize shrink width 10 px or 10 ppt
bindsym $mod+Control+k resize grow height 10 px or 10 ppt
bindsym $mod+Control+j resize shrink height 10 px or 10 ppt
bindsym $mod+Control+h resize grow width 10 px or 10 ppt
A few notes on the General settings:
- Resizing and moving floating windows with the mouse also works great:
mod+LeftClickto move around andmod+RightClickto resize. This way, it’s also possible to move windows to other screens.
Screens and monitors
# lock the screens with a black color background
bindsym $mod+Delete    $exec i3lock -c 000000

# hide/unhide i3status bar (laptop)
bindsym $mod+m         bar mode invisible bar-0
bindsym $mod+Shift+m   bar mode dock bar-0

# hide/unhide i3status bar (monitor)
bindsym $mod+b         bar mode invisible bar-1
bindsym $mod+Shift+b   bar mode dock bar-1

# set up displays
exec $path-xrandr-both

# use laptop display only (turn off monitor)
bindsym $mod+o         exec $path-xrandr-laptop

# use monitor display only (turn off laptop screen)
bindsym $mod+mod1+o    exec $path-xrandr-monitor

# use laptop + monitor displays
bindsym $mod+shift+o   exec $path-xrandr-both

# disable screen saver
$exec   xset s off

# disable power saving
$exec   xset -dpms
A few notes on the Screens and monitors section:
- It sets keybindings to hide/unhide bars on separate screens, which can be particularly useful when screen sharing without having to enter in fullscreen mode.
- It has additional keybindings to turn on/off the displays independently.
Navigation
Note: I rely on Vim keybindings to move between containers and workspaces as I find the position of those keys on the home row really comfortable to apply to the main window actions one would want to execute.
# container focuses where the mouse is (yes/no)
focus_follows_mouse    no

# go to last urgent workspace
# ⇒ this is the worspace that turns "red" by default when something happens
#   in an unfocused workspace, like an application pop-up
bindsym $mod+u    [urgent=latest] focus; $center-mouse

# change focus
# ⇒ works in all modes: tabbed, stacked, etc.
bindsym $mod+h    focus left; $center-mouse
bindsym $mod+j    focus down; $center-mouse
bindsym $mod+k    focus up; $center-mouse
bindsym $mod+Down focus down; $center-mouse
bindsym $mod+Up   focus up; $center-mouse
bindsym $mod+l    focus right; $center-mouse

# move focused window (works in all modes)
bindsym $mod+Shift+h   move left; $center-mouse
bindsym $mod+Shift+j   move down; $center-mouse
bindsym $mod+Shift+k   move up; $center-mouse
bindsym $mod+Shift+l   move right; $center-mouse

# for example, switching from workspace 1 to workspace 2 (e.g. mod+2) then
# typing again mod+2 would bring you back to workspace 1 without having to
# remember that you came from workspace 1 in the first place.
workspace_auto_back_and_forth    no

# alternate between the last two workspaces that have been used
bindsym $mod+Tab    workspace back_and_forth

# move a container (window or group of windows if you grouped them) to the
# "alternate" workspace you visited last
# (the one brought with $mod+Tab in this case)
bindsym $mod+mod1+Tab    move container to workspace back_and_forth; \
                           workspace back_and_forth

# switch to any window with Rofi
# ⇒ this simulates the familiar behavior of Alt+Tab on Windows and allows you
#   to find windows by typing, but uses a better operating system to do it ;).
bindsym Mod1+Tab    exec "rofi -theme lb -font $rofi-font \
                      -show-icons -width 95 -show window"

# toggle fullscreen mode for the focused container
# ⇒ this hides the i3bar for the current monitor
# ⇒ you can still leave the i3bar hidden and switch to other workspaces
bindsym $mod+f    fullscreen toggle

# navigate workspaces next / previous
# ⇒ works for all monitors and will go in increasing order
#   if workspaces 1 to 6 are on monitorX and workspaces
#   7 to 10 are on monitorY as in this config, this will switch
#   to any workspace where there is at least one container
bindsym $mod+Mod1+l         workspace next
bindsym $mod+Mod1+h         workspace prev
bindsym $mod+Shift+Right    workspace next
bindsym $mod+Shift+Left     workspace prev

# the difference with the above is that it limits movements to the
# the current monitor only
bindsym $mod+Right            workspace next_on_output
bindsym $mod+BackSpace        workspace next_on_output
bindsym $mod+Shift+BackSpace  workspace prev_on_output
bindsym $mod+Left             workspace prev_on_output

# Bindings to "mark" and "goto" mark specified with 1 character
# ⇒ rarely used, but can still be useful if you have many containers open
bindsym $mod+z    exec i3-input -F 'mark %s' -l 1 -P 'Mark: '
bindsym $mod+g    exec i3-input -F '[con_mark="%s"] focus' -l 1 -P 'Goto: '

# switch to workspace (no matter which monitor it is set to)
bindsym $mod+1    workspace $ws1
bindsym $mod+2    workspace $ws2
bindsym $mod+3    workspace $ws3
bindsym $mod+4    workspace $ws4
bindsym $mod+5    workspace $ws5
bindsym $mod+6    workspace $ws6
bindsym $mod+7    workspace $ws7
bindsym $mod+8    workspace $ws8
bindsym $mod+9    workspace $ws9
bindsym $mod+0    workspace $ws10

# determine which workspace appears on which screen
# ⇒ with a single output screen, this is not necessary
workspace 1  $output-secondary
workspace 2  $output-secondary
workspace 3  $output-secondary
workspace 4  $output-secondary
workspace 5  $output-secondary
workspace 6  $output-secondary
workspace 7  $output-primary
workspace 8  $output-primary
workspace 9  $output-primary
workspace 10 $output-primary

# move focused container to workspace and switch to workspace
bindsym $mod+Shift+1    move container to workspace $ws1;  workspace $ws1
bindsym $mod+Shift+2    move container to workspace $ws2;  workspace $ws2
bindsym $mod+Shift+3    move container to workspace $ws3;  workspace $ws3
bindsym $mod+Shift+4    move container to workspace $ws4;  workspace $ws4
bindsym $mod+Shift+5    move container to workspace $ws5;  workspace $ws5
bindsym $mod+Shift+6    move container to workspace $ws6;  workspace $ws6
bindsym $mod+Shift+7    move container to workspace $ws7;  workspace $ws7
bindsym $mod+Shift+8    move container to workspace $ws8;  workspace $ws8
bindsym $mod+Shift+9    move container to workspace $ws9;  workspace $ws9
bindsym $mod+Shift+0    move container to workspace $ws10; workspace $ws10
A few notes on the Navigation section:
- I like to keep the number of workspaces to 10 because the number row is easily accessible and there’s less context switching involved.
- I also like to keep a higher number of workspaces on the main screen I work on as I can use
mod+Leftandmod+Rightto switch focus on that screen only. This is usually to keep a reference opened on the other screen, like server logs. - Those keybindings make it really easy to navigate between workspaces on one particular screen. Even though I like to work with a monitor being higher than the laptop located in front of it to avoid working in a twisted position at all times, this would work fantastically well in the horizontal direction too.
- If for whatever reason the main screen is disconnected (power outage or unplugged), I can still use the laptop screen without needing to modify the config file, although with a slightly more limited amount of workspaces. Tip: if a monitor has been disconnected (such as in the power outage scenario), using the keybinding to turn it off will move all the workspaces to the other display(s), so everything will be visible again.
Nice addition to make the mouse follow any focused container
By default, the focus of the mouse in i3 will go to the active screen, but it won’t follow the focus if switching to different containers on the same screen. I found this little hack using the center-mouse script after running commands like move and focus to force the mouse to move to any focused container. For convenience, here is the content of that script. You will need the program xdotool to use it.
Layout
# set default desktop layout (default is tiling), <stacking|tabbed>
workspace_layout    tabbed

# change container layout (stacked, tabbed, toggle split)
bindsym $mod+s    layout stacking
bindsym $mod+w    layout tabbed
bindsym $mod+e    layout toggle split

# start in opposite orientation from your monitor
default_orientation    vertical

# toggle split at each new window (Fibonnaci layout)
# note: only useful if the layout is set to `default`
# for_window [class=".*"]    split toggle

# toggle the way a split happens in the focused window
bindsym $mod+t    split toggle

# toggle tiling / floating
# ⇒ this works on a container with any number of windows!
#   if you select multiple windows with `$mod+a` (see below)
#   to group them and then toggle them, the whole group will
#   either tile or float
bindsym $mod+Shift+space    floating toggle

# change focus between tiling / floating windows
# ⇒ If you leave a floating window on top of other tiled windows,
#   you can switch the focus from the one on top to the one(s) in
#   the background (useful with apps like Zoom or Google Meet that
#   you want to keep in the foreground)
bindsym $mod+space    focus mode_toggle

# Use Mouse+$mod to drag floating windows
floating_modifier    $mod

# toggle sticky for floating windows
bindsym $mod+Shift+s    sticky toggle

# focus the surrounding containers
bindsym $mod+a    focus parent; $center-mouse
bindsym $mod+c    focus child; $center-mouse
A few notes on the Layout section:
- To maximize the size of applications, I prefer using the “tabbed” mode, which is more compact than the stacking mode. If I quickly want to split windows side-by-side, I just type
mod+eto toggle split vertically by default and if I need a horizontal split, I just toggle again withmod+e. - I don’t use the “grouping” feature with
mod+aandmod+cvery often, but when I need to move a few windows to another workspace for instance, that’s quite handy! - A floating window in “sticky mode” will follow you on all your workspaces and remember that this mode is enabled even if you put in back in a tiling window and then to a floating window again.
Scratchpad
The scratchpad is sometimes so useful that it deserves its own section! When you send a window to the “scratchpad”, it disappears. Then, with a keybinding, you can bring in back in floating mode on top of any other window on any active workspace you happen to be in. The same keybinding will toggle on/off the display of that scratchpad and if you happen to have sent multiple windows to the scratchpad, activating the same keybinding again will cycle through all the scratchpads as we set a custom mode called Scratchpad in this example.
I often use that for an audio player I leave running in the background and instead of using a whole workspace to leave that window opened, I send it to the scratchpad, which means it doesn’t take any space and I can quickly bring it back in focus whenever I want, in any workspace. I find that having more than three windows in the list of scratchpads becomes cumbersome as you cycle through them, so I keep the scratchpad for specific, infrequent uses for applications that require less attention.
If you want to convert a scratchpad back to a regular tiled container, it’s as easy as triggering “toggle tiling / floating” (in this config file, it happens with mod+Shift+space).
# Move the currently focused window to the scratchpad.
# First, we toggle floating mode and we resize and position the window to make sure
# it will appear correctly when showing it for the first time.
bindsym $mod+minus    floating toggle; resize set $scratchpad-size, \
                        move position center; move scratchpad

# Set up scratchpad applications
for_window [class="Audacious"]           floating enable
for_window [class="Audacious"]           move scratchpad
for_window [class="Audacious"]           resize set $scratchpad-size
for_window [instance=$temp-notes]        floating enable
for_window [instance=$temp-notes]        move scratchpad
for_window [instance=$temp-notes]        resize set $scratchpad-size
for_window [instance=$python-term]       floating enable
for_window [instance=$python-term]       move scratchpad
for_window [instance=$python-term]       resize set $scratchpad-size
for_window [instance=$todoist-app-name]  floating enable
for_window [instance=$todoist-app-name]  move scratchpad
for_window [instance=$todoist-app-name]  resize set $scratchpad-size
A note on the Scratchpad section:
- In my setup, I have two screens with the same resolution of 1920x1080, so the same “resize” command works on both screens. You might want to use two different keybindings if you want to bring a scratchpad back to a screen with a different resolution.
Borders
# Configure border style <normal|1pixel|pixel xx|none|pixel>
new_window pixel 5
new_float normal
default_floating_border pixel 5

# Hide borders
hide_edge_borders smart

# change borders
bindsym $mod+Shift+n   border none
bindsym $mod+n         border pixel 5
bindsym $mod+y         border normal 5
A few notes on the Borders section:
- I just love knowing which container is active, so I set thick, bright borders with a nice kind of “electric blue” color that’s easy to spot on a light or dark background (colors are set below in the section Colors & theming).
- I also love saving space whenever possible to see more stuff on the screen, so I avoid gaps altogether (if you like them, have a look at i3-gaps). In that spirit, I also set the option
hide_edge_borders smartso that borders don’t show up when I have only one tiled container covering the whole space. - This also shows that you can have a different border size for floating windows if you find the thickness distracting. Personally, I just find it helps me know which container is active when I toggle from foreground to background window with
mod+space.
dmenu
dmenu is so useful that it also got its own section. By default, you usually launch applications with mod+d: I kept the same behavior here. I added a few custom launchers that I use all the time to open files based on a topic, using mnemonics that work (for me, at least). If you want to know more about setting these kinds of shortcuts, you may be interested in reading Using dmenu to Optimize Common Tasks ;).
bindsym $mod+Mod1+b    $exec ~/Dropbox/.custom/dmenu/books.sh
bindsym $mod+Mod1+c    $exec ~/Dropbox/.custom/dmenu/cheatsheets.sh
bindsym $mod+Mod1+d    $exec ~/Dropbox/.custom/dmenu/documents.sh
bindsym $mod+Mod1+e    $exec ~/Dropbox/.custom/dmenu/edit_scripts.sh
bindsym $mod+Mod1+f    $exec ~/Dropbox/.custom/dmenu/filepaths.sh
bindsym $mod+Mod1+q    $exec ~/Dropbox/.custom/dmenu/quotes.sh
bindsym $mod+Mod1+r    $exec ~/Dropbox/.custom/dmenu/reading.sh
bindsym $mod+Mod1+s    $exec ~/Dropbox/.custom/dmenu/scripts.sh
bindsym $mod+Mod1+u    $exec ~/Dropbox/.custom/dmenu/university.sh
bindsym $mod+Mod1+w    $exec ~/Dropbox/.custom/dmenu/work.sh
bindsym $mod+Shift+f   $exec ~/Dropbox/.custom/dmenu/thunar_launcher.sh
bindsym $mod+Shift+u   $exec ~/Dropbox/.custom/dmenu/university_launchers.sh
bindsym $mod+d         $exec ~/Dropbox/.custom/dmenu/software.sh
Shortcuts
bindsym $mod+control+r $exec thunar ~/Desktop
# Display multiple time zones around the world
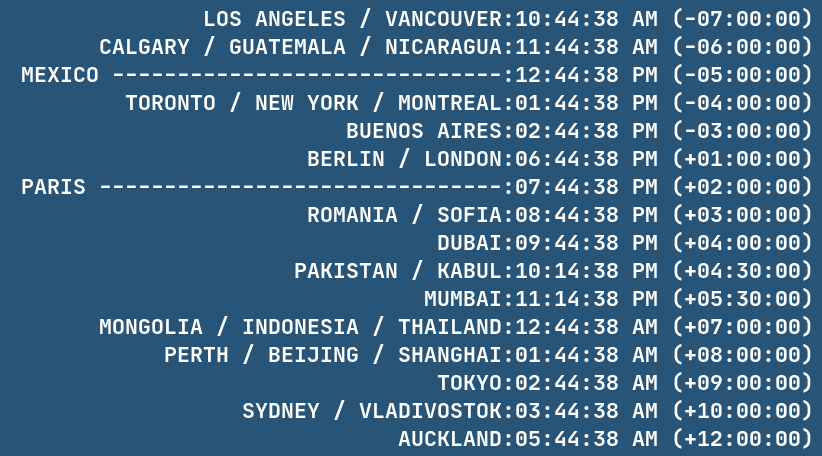
bindsym $mod+Mod1+t $exec ~/Dropbox/.custom/dmenu/times.sh
A few notes on the Shortcuts mini-section:
- In i3, you don’t really make use of icons on the desktop. I like the absence of visual clutter it provides, but I sometimes like to access a specific folder in which I drop a few shortcuts/symlinks to access other files from there.
- An idea for customization: working remotely with many teammates from around the world is sometimes confusing timewise, so I have a simple script that outputs the current time in the places I’m interested in monitoring.
Sound
# `pkill` is useful to quickly update the block in i3blocks
bindsym XF86AudioRaiseVolume    exec $volumepath -np up $volumestep -t $statuscmd \
                                    -u $statussig && pkill -RTMIN+1 i3blocks
bindsym XF86AudioLowerVolume    exec $volumepath -np down $volumestep -t $statuscmd \
                                    -u $statussig && pkill -RTMIN+1 i3blocks
bindsym XF86AudioMute           exec $volumepath mute -n -t $statuscmd \
                                    -u $statussig && pkill -RTMIN+1 i3blocks
bindsym XF86AudioMicMute        $exec $toggle-mic-on-off
bindsym $mod+exclamdown         $exec $toggle-mic-on-off

# Automatically set the volume to a given value when (re)launching i3
exec_always --no-startup-id "amixer -D pulse set Master 50%"

# Always mute the microphone source when (re)launching i3
exec_always --no-startup-id pactl set-source-mute \
            "alsa_input.pci-0000_03_00.6.analog-stereo" true && \
            pkill -RTMIN+10 i3blocks
This section will depend on the hardware being used, but it gives an idea of how to do things. I use i3-volume to get nice notifications when changing the volume and all the options being set here use i3-volume. Toggling the mic output was not super obvious at first, but it’s obviously doable and it’s good to know there’s an XF86Audio property for that purpose!
Brightness
# Control brightness more precisely through software `light`
bindsym XF86MonBrightnessDown    exec $brightness-laptop-down
bindsym XF86MonBrightnessUp      exec $brightness-laptop-up

# Adjust external monitor brightness
bindsym $mod+F2   $exec $brightness-monitor-down
bindsym $mod+F1   $exec $brightness-monitor-up
bindsym $mod+F3   $exec $brightness-monitor-default

# Toggle laptop screen
bindsym $mod+Control+b    $exec $brightness-toggle-laptop
To control the screen brightness, I use light. I also like to just toggle the brightness of my laptop at night when I read something on my external monitor, so I use a toggle_laptop_brightness script that I found somewhere online and adapted slightly.
Applications
This section will heavily depend on the software you use of course, but there’s the gist of it. I like to have a shortcut for bashtop to quickly monitor system resources (glances is also quite nice). Besides that, I like to have applications automatically appear on specific workspaces and be switched to in some instances.
Controlling which application opens in floating mode is also useful as some just don’t play that well with tiling. To find information about an application, you can open a new terminal window and launch xprop, click on the window you need information about and voilà, a couple of strings will be displayed like so (output truncated a bit):
	Icon (16 x 16):
	     ▒▓▓▓▓▒
	   ▒▓██████▓▒
	  ▒█▓▒░  ░▒▓█▒
	 ▒█▓░      ░▓█▒
	 ▓▓░  ░░░   ░▓▓
	▒█▒  ░███▓░  ▒█▒
	▓█░   ░░▓█▓  ░█▓
	▓█   ░▓▓██▓   █▓
	▓█   ▓█▒▓█▓   █▓
	▓█░  ▓█▓▓█▓  ░█▓
	▒█▒  ░▓▓▒▓▒  ▒█▒
	 ▓▓░        ░▓▓
	 ▒█▓░      ░▓█▒
	  ▒█▓▒░  ░▒▓█▒
	   ▒▓██████▓▒
	     ▒▓▓▓▓▒
WM_NORMAL_HINTS(WM_SIZE_HINTS):
		program specified location: 0, 0
		program specified minimum size: 627 by 279
		window gravity: NorthWest
WM_CLASS(STRING) = "audacious", "Audacious"
WM_ICON_NAME(STRING) = "47. David Bowie - Best Of Bowie - Heroes (3:36) - Audacious"
WM_NAME(STRING) = "47. David Bowie - Best Of Bowie - Heroes (3:36) - Audacious"
You may need to switch to tiling windows or make the terminal window that launches xprop a floating window to be able to click on the desired window. Here, we get an output for the Audacious music player. You usually need the second string from WM_CLASS(STRING) but if you don’t want to mess with letter casing being upper vs lowercase, you can prefix with (?i) for “insensitive” as shown below and that will match any window containing that pattern. Sometimes, you’re just after matching a “title” (like it’s done with LibreOffice in the snippet of code below) and you can get that one by showing the container’s border. With this config file, the mod+n keybinding will show the border you want at the top and mod+y will make it disappear again.
# Autostart applications
$exec  $brightness-monitor-default
$exec  $default-web-browser
$exec  $launcher-todoist
$exec  brightnessctl s 20%
$exec  compton -CG --config /dev/null
$exec  nitrogen --restore
$exec  nm-applet
$exec  pasystray
$exec  xfce4-clipman

# First kill it as it doesn't always respect the `--timeout` option otherwise
exec_always --no-startup-id  "killall unclutter; unclutter --jitter 40 --ignore-scrolling --timeout 5 &"

# Start
bindsym $mod+Shift+d --release      exec "killall dunst; exec notify-send 'restart dunst'"
bindsym $mod+Shift+t                exec thunar
bindsym $mod+Shift+w                $exec $default-web-browser
bindsym $mod+masculine              [instance=$python-term] scratchpad show; move position center
bindsym $mod+Shift+masculine        $exec kitty --name ipythonterm -o font_size=22 -e \
                                        $launcher-python-term -q
bindsym $mod+plus                   [instance=$temp-notes] scratchpad show; move position center
bindsym $mod+Shift+plus             $exec kitty --name tmpnotes -e $launcher-temp-notes
bindsym $mod+p                      [class="Audacious"] scratchpad show; move position center
bindsym $mod+Shift+p                $exec audacious
bindsym $mod+q                      [instance=$todoist-app-name] scratchpad show; move position center
bindsym $mod+Shift+q                $exec $launcher-todoist
bindsym Print --release             $exec flameshot gui --path $screenshots-folder
bindsym $mod+Print --release        $exec flameshot screen --path $screenshots-folder
bindsym mod1+F3                     $exec kitty -e htop

# Open applications on specific workspaces
assign [class="(?i)code"]                  $ws1
assign [class=$default-web-browser]        $ws3
assign [class="(?i)firefox"]               $ws3
assign [class=$default-web-browser-class]  $ws3
assign [class="Audacity"]                  $ws4
assign [class="Gimp"]                      $ws4
assign [class="Inkscape"]                  $ws4
assign [class="vlc"]                       $ws4
assign [class="(?i)atril"]                 $ws6
assign [class="(?i)zathura"]               $ws6
assign [title="(?i)libreoffice"]           $ws4
assign [class="Transmission"]              $ws8
assign [class="keepassxc"]                 $ws8
assign [class="obs"]                       $ws8

# Automatically switch to workspace when opening those
for_window [class="(?i)code"]                   workspace $ws1
for_window [class=$default-web-browser]         workspace $ws3
for_window [class=$default-web-browser-class]   workspace $ws3
for_window [class="(?i)firefox"]                workspace $ws3
for_window [class="Gimp"]                       workspace $ws4
for_window [class="Inkscape"]                   workspace $ws4
for_window [class="audacity"]                   workspace $ws4
for_window [class="vlc"]                        workspace $ws4
for_window [class="(?i)zathura"]                workspace $ws6
for_window [class="(?i)atril"]                  workspace $ws6
for_window [title="(?i)libreoffice"]            workspace $ws4
for_window [class="Transmission"]               workspace $ws8
for_window [class="keepassxc"]                  workspace $ws8
for_window [class="obs"]                        workspace $ws8

# Open specific applications in floating mode
for_window [class="(?i)virtualbox"]   floating enable border pixel 5
for_window [class="GParted"]          floating enable border pixel 5
for_window [class="Lightdm-settings"] floating enable pixel 5
for_window [class="Lxappearance"]     floating enable sticky enable border pixel 5
for_window [class="Nitrogen"]         floating enable sticky enable border pixel 5
for_window [title="File Transfer*"]   floating enable border pixel 5
for_window [title="alsamixer"]        floating enable border pixel 5
for_window [class="(?i)zoom"]         floating enable border pixel 5
The section Autostart applications is the list of applications that launch when you open your X session with i3.
Keyboard & mouse
# Set compose key to Right Ctrl
exec_always --no-startup-id    setxkbmap -option $compose-key

# Delay, interval
exec_always --no-startup-id    xset r rate 250 60
I like to set those options in my config file as they can be modified on the fly if you reload i3. This is thanks to the exec_always --no-startup-id directive which will always run the invoked command when relaunching, not just when logging in to a session.
Colors & theming
Of interest in this section, apart from the actual colors, is where you will set your i3bar on the screen (top vs bottom) and on which monitor your tray (the space with little icons to show the volume, WiFi connectivity and so on) will be displayed if you have more than one monitor. In this case, the bar displays at the top of the screen à la Mac or à la GNOME with position top and reveals information about system resources with i3blocks (you can find how it can be configured in my dotfiles or in the i3blocks GitHub repo).
# Start i3bar to display a workspace bar (plus the system information i3status if available)
bar {
    id bar-1
    $font-small
    $output-secondary
    # mode invisible
    tray_output none
    status_command i3blocks
    position top

    colors {
        background #000000
        statusline #ffffff
        separator  #666666
#                          border  backgr. text
        focused_workspace  #4c7899 #285577 #ffffff #ffffff
        active_workspace   #333333 #5f676a #ffffff #3c3b37
        inactive_workspace #333333 #222222 #888888 #aea79f
        urgent_workspace   #2f343a #900000 #ffffff #ffffff
    }
}

bar {
    id bar-0
    $font-medium
    $output-primary
    tray_output primary
    status_command i3blocks
    position top
    bindsym button4 nop
    bindsym button5 nop

    colors {
        background #000000
        statusline #ffffff
        separator  #666666
#                          border  backgr. text
        focused_workspace  #4c7899 #285577 #ffffff #ffffff
        active_workspace   #333333 #5f676a #ffffff #3c3b37
        inactive_workspace #333333 #222222 #888888 #aea79f
        urgent_workspace   #2f343a #900000 #ffffff #ffffff
    }
}

# Theme colors
# class                   border  backgr. text    indic.  child_border
  client.focused          #ffffff #ff0054 #ffffff #2e9ef4
  client.focused_inactive #333333 #8338ec #ffffff #484e50
  client.unfocused        #333333 #000000 #bbbbbb #292d2e
  client.urgent           #2f343a #900000 #ffffff #900000
  client.placeholder      #F9FAF9 #061229 #FFFFFF #061229
  client.background       #000000
What I’ve found particularly useful here is the fact you can have a different “i3 bar” for each screen. I’ve set keybindings in the section Screens and monitors so I can toggle them on/off separately too.
I’ve also switched away from the default i3status program to display the status bar(s) to i3blocks, which I’ve found a lot nicer to look at and easier to configure too.
Theming i3 can be tedious, but thankfully there are tools to automate the process! One such tool is i3-style, which allows you to quickly switch in place your theme without having to log out or modify manually your i3 config file. To go the manual route or to tweak an existing theme, you can always use a website like HTML Color Codes to find an exact hexadecimal value. You can also use terminal.sexy to come up with nice looking themes, which can be exported for other applications you may be using.
Conclusion
You can find the complete config file in my dotfiles on GitHub. If you liked this article, you may also enjoy reading the following ones:
- Suckless: Minimalist Tools That Work Great
- Using dmenu to Optimize Common Tasks
- Using i3 as a Window Manager for Increased Productivity
More resources and references
- Getting started with the i3 tiling window manager — Fedora Magazine
- Official i3 documentation — i3wm.org
- i3 page on the Arch Wiki — Arch Wiki